Wire Insertion Best Practices in Connectors

Every failed connection costs you time and money. A single faulty wire insertion can bring production to a halt, compromise device safety, and damage your reputation. You need reliable connections every single time, without exception. Today, we will outline the wire insertion best practices in connectors you must follow to get it right from the start.
Faulty connections don't just happen; they are commonly manufactured through poor technique and a lack of attention to detail. From improper wire stripping to incorrect seating, each misstep introduces a potential point of failure. The result is intermittent signals, power loss, and catastrophic system breakdowns that are otherwise avoidable. We're here to show you how to build robust, dependable connections that stand up to the demands of your applications.
Preparation is Not Optional
Before a wire ever touches a connector, your preparation sets the stage for success or failure. The right tools and a properly prepared wire are non-negotiable. Get this part wrong, and no amount of skill during insertion will save the connection.
Select the Right Wire and Tooling
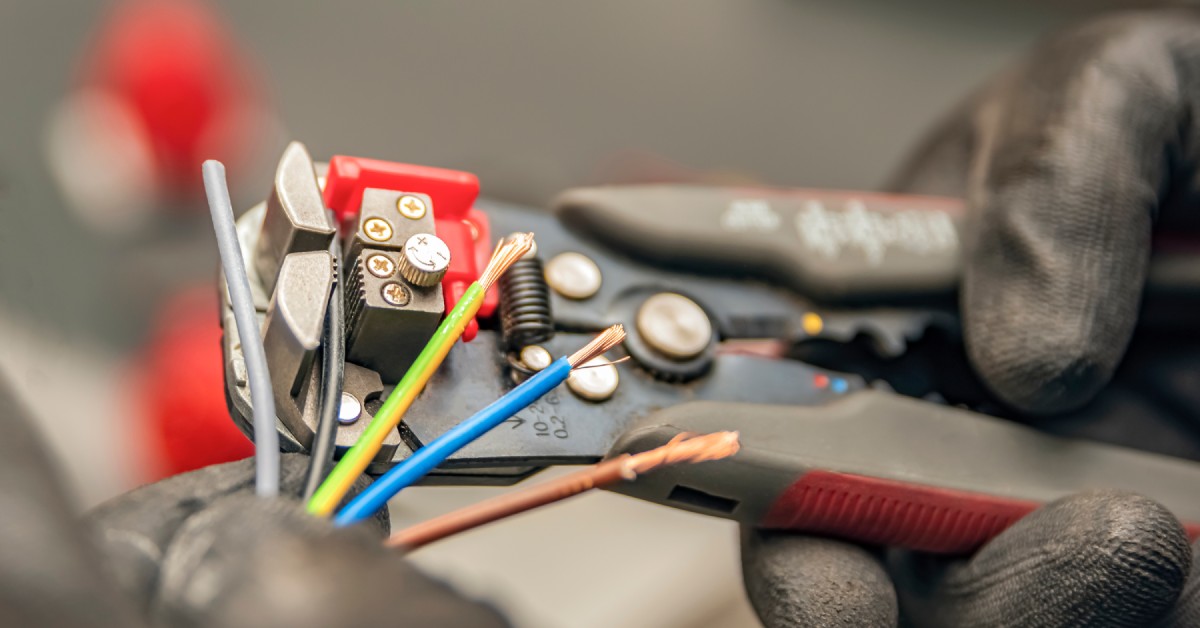
Your first action is to confirm you have the correct wire gauge for the connector terminal. After all, cables and connectors are available in many designs. For example, you can find 3-wire connectors online, but some options are larger.
A wire that is too large will not fit, and one that is too small will not create a secure mechanical and electrical bond. Check the manufacturer's specifications for both the connector and the terminals to confirm compatibility.
Next, select your wire stripping tool. Automatic wire strippers are a solid choice for consistency, as they can be set to a specific strip length and prevent damage to the wire's conductors. Manual strippers work, but they demand a higher level of skill to avoid nicks or cuts in the copper strands. For high-volume work, a dedicated stripping machine provides unparalleled speed and precision.
Crimping tools must also match the terminal. Using the wrong crimper, or even the wrong die set in a multi-die tool, is a direct path to a bad crimp. A proper crimp tool applies even, controlled pressure to form the terminal correctly around the wire, which creates a durable, gas-tight connection. Pliers are not crimpers; using them will result in a weak connection that will fail under vibration or thermal cycling.
The Art and Science of Wire Stripping
Stripping insulation from a wire seems basic, but this is where many failures begin. The goal is to remove a precise length of insulation without damaging the underlying conductors. It's a balance of precision and control.
Achieve the Perfect Strip Length
Every connector terminal has a specified strip length. This measurement is always calculated to allow the conductor to fully seat within the crimp barrel without any exposed wire showing on the other side. Too short a strip, and the wire won't make full contact, which results in a weak electrical connection.
On the other hand, a strip that is too long exposes excess conductor. This exposed wire creates a risk of short circuits if it touches an adjacent terminal or conductive surface. Use a caliper or the guide on your wire stripper to confirm you are removing the exact amount of insulation required by the terminal's data sheet.
Preserve Conductor Integrity
When you remove the insulation, the conductors beneath must remain pristine. Any nicks, cuts, or broken strands weaken the wire and reduce its current-carrying capacity. A nick creates a stress point where the wire is likely to break under vibration or repeated flexing.
Adjust your stripping tool to cut only through the insulation, not into the copper. After stripping, visually inspect the conductors. You should see a clean, untwisted bundle of strands with no visible damage. If you see broken or scored strands, cut the wire and start over. A few seconds of rework is better than a field failure.
Mastering the Crimp
The crimp is the heart of the wire-to-terminal connection. It's a cold-weld process that permanently bonds the terminal to the wire. A correct crimp is both mechanically strong and electrically superior, able to withstand physical stress and environmental changes.
Align for Success
Proper alignment is crucial. The stripped conductor must be inserted into the terminal's crimp barrel until it stops. You should be able to see the ends of the conductor strands through the inspection window at the front of the terminal. The wire's insulation should also be flush against the back of the crimp barrel, where it will be fully secured by the insulation crimp.
Once you correctly position the wire, place the terminal into the correct nest in your crimping tool. The tool's anvils must be accurately aligned with the terminal's conductor and insulation crimp zones.
Execute the Crimp with Confidence
With everything aligned, squeeze the crimp tool handles firmly until the ratchet mechanism releases. This full-cycle ratchet is a critical feature; it prevents under-crimping by not allowing the jaws to open until a full compression cycle is complete. The result is a perfect, repeatable crimp every time.
After crimping, perform a visual inspection. The conductor crimp should be symmetrical and tight, with no loose strands. The insulation crimp should provide strain relief by gripping the insulation, but not so tightly that it cuts through it. Finally, perform a gentle pull test. The wire should not pull out of the terminal. A firm tug will confirm the mechanical integrity of the connection.
The Final Step: Insertion into the Housing
With a perfectly crimped terminal, you are ready for the final step: inserting it into the connector housing. This step locks the terminal in place and protects the connection.
Orientation and Insertion
Each connector housing has polarized cavities designed to accept a terminal in only one orientation. Look for features like chamfers, ribs, or notches on both the terminal and the housing cavity. These guides force the correct alignment.
Push the crimped terminal straight into the back of the correct housing cavity. Do not angle or force it.
Verify Full Seating
Never assume a terminal is fully seated just because it clicked. After insertion, give the wire a light tug from the rear of the connector. It should not move or pull out.
Visually inspect the front of the connector mating face. All terminals should be visible and appear to be at the same depth. An under-seated terminal will be recessed, which indicates it has not locked into place. This terminal will cause an intermittent or open connection when the connectors are mated. Correct it immediately.

Your Framework for Flawless Connections
Building reliable electrical systems leaves no room for error. By adhering to these procedures, you move from guesswork to a systematic process that delivers consistent, high-
From selecting the right materials to the final verification tug, each step is part of a chain of quality. Follow these wire insertion best practices in connectors, and you will build connections that are as strong and reliable as the systems they power.